
Stebel Nautilus Compact Air Horn Install
Stock Harley-Davidson horns have a tendency to stop working. Here’s the instructions on how to replace your stock horn with a Stebel Nautilus air horn.
Disconnect the battery negative ground before proceeding.
I’ve been getting some questions about the reliability of the Stebel Nautilus Compact Air Horn. Since installing the horn in early 2006, to date (June 2012), I’ve had 100 percent reliability, and I’ve got tens of thousands of miles on mine since installation. As the instructions say, the compressor must remain upright. In addition, I put padding on the bottom to cover the connectors so that they don’t get damaged and/or short out.
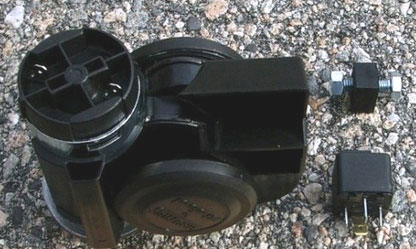
Here’s a link to a typical relay and a description of the terminals to be used for a replacement horn.

- Disconnect the two leads from the stock horn.
- Connect the stock horn wires to post 85 and post 86 of the Stebel-supplied relay.
- Connect a wire between post 87 and the positive (+) connection on the compressor.
- Connect a wire from the negative (-) side of the compressor to a good ground, e.g. the frame, or the negative accessory wire.
- Connect a wire between post 30 on the relay and a good 12v positive source, OR directly to the battery (+). The post 30 wire lead should be fused, with a 20 amp fuse, maximum.
- Post 87a is not used. It was cut off of the Stebel relay I received.

- Because I mounted the compressor under the seat, I separated the horn from the compressor. This takes a fair amount of force to do, by pushing up on the compressor to slide it out of the plastic horn bracket.
- I then cut the bracket off of the horn, since I was going to slide
the horn up under the OEM chrome horn cover.

- Here you can see the horn inserted into the horn cover.
- I used three brass fittings to point the inlet to the back of the horn cover: 1) a hose adapter; 2) an elbow; and, 3) the hose adapter.
- The assembled brass fittings complete with the horn can be slid into
the horn cover after all three are attached to the horn. - I used zip-ties to ensure the horn won’t fall out of the cover.
I removed the fuel tank to gain complete access to the two leads for the horn and repositioned them so that they would end up under the seat. If you don’t want to remove the fuel tank, you can extend the leads to under the seat with additional wire. Then I attached the relay to the leads as per the list above and then connected the compressor.
I wrapped the compressor in bubble wrap and placed it upright under the seat in the space between the battery and the frame on my ’95 FLHT. On my bagger, the main power relay is also located there, which is why I wrapped the compressor in the bubble wrap. I’m trying to think of a better way to do this because it appears to be a pretty mickey mouse way of doing things.
I would have liked to mount the compressor under the left side cover on my bagger, but I have a switched fuse block located there.
A length of 1/4 inch rubber hose is attached to the compressor and ends at the horn. Press the button, and man, is that sucker loud!
A very well written and detailed installation.
Thanks, Kieran. The installation is over three years old now, and the original compressor is still working well. Although others report problems with the Stebel compressor, I have had none, perhaps because it is mounted upright and under the seat, thus protecting it from rain and power spray washing.
I just used your instructions to put this horn on my 2003 Road King. It sounds great but is not as loud as I thought it would be. What do think could be causing it. The 1.5 of hose is probably slowing down the air. Great job with the relay worked the first try!
What diameter of hose did you use? I used 1/4 inch. Use anything larger and it won’t conduct enough pressure to run the horn.
Hello All
I have one of these horns on my 2007 super glide custom. it has worked perfect since I installed it in about 2008. My battery recently died even while I had it on my tender. I replaced the battery and the starter relay. I also replaced the horn relay. My bike starts fine now but my horn still will not work. When I push the horn button with the ignition switch off the lights in my speed and tac come on and both my needles look like they are discharging. If I let on on the horn button the lights go off and the needles return to their normal positions. With the ignition switch on nothing happens and no horn. I have jumped the horn directly to a 12 battery and it works fine I also jumped it at the connection where the relay pugs in and the horn works fine. But with the new relay in I get nothing. I would greatly appreciate any advice or suggestions to help me solve this problem. Thank you in advance for your assistance.
vr
Joe Galvagna Jr CWO4 USMC (ret)
Why did you change the horn relay? Did it stop functioning? Have you swapped out the new relay with the old relay to check it? Are you certain that you reconnected it properly, with wires going to the proper connections on the relay? Perhaps the new relay is faulty.